Quantcast
Channel: Xposed Framework – GizDev
Viewing all 27 articles
Browse latest View live

[GUIDE] Install Xposed Framework On Lollipop Android 5.1, 5.0

$
0
0

Xposed Framework On Lollipop Android 5.1, 5.0

Xposed_Framework_lollipop


Finally Xda Member rovo89 Created Working Method To Install Xposed Framework For Android 5.0 & Android 5.1 After Many Experiment.

What Is Xposed Framework? Xposed Framework Is A Framework To Customize Your Phone Without Custom Roms , Like Notification Panel, Themes, Crack Apps, Extra Boot Options, Audio Optimize, And Many Plugins You Can Download And Install It By Search From   Xposed Framework App

Note:- Don’t Try In Samsung Stock Lollipop Rom, Install Custom Rom In Samsung Then Install Xposed Other Wise Device Will Brick

Preparation 

  • Need Rooted Devices With Cwm Or Twrp Custom Recovery
  • Custom Rom Or Updated Lollipop Stock Rom
  • Backup Your Files Data
  • Backup Full Rom Via Cwm Or Twrp
  • Download The Required  Files And Read Instruction

Download Xposed Installer And Required Files


Instruction 

  • Download The Zip File For Your Perfect Version Of Your Android
  • Unzp The Zip File
  • Check Your Device Processors X64 Or Arm 7  Or Non Arm Device  Via Cpu Z 
  • WP-Appbox: CPU-Z (Free*, Google Play) →

  • Copy The Perfect Zip File To Sd Card And Flash It Via Recovery
  • xposed-v70-sdk2*-arm64.zip For arm64  xposed-v70-sdk21-arm.zip For Arm 7 Devices
  • xposed-v70-sdk2*-x86.zip For 32 Bit Processors
  • Install The Framework  Zip Via Recovery Mode
  • Wipe Cache After Install Via Recovery
  • Reboot The Device
  • Install XposedInstaller_3.0_alpha4.apk 

Now Enjoy Xposed On Lollipop 🙂

Note:- If You Developer You Can Develop Xposed  Using Xposed BridgeApi-20150213.jar In Zip File

If Facing Any Problem After Install Simply Use xposed-uninstaller-**.zip  Files For And Flash It Via Recovery

Source:-Xda Forum

Share My Article  If You Like 😉

The post [GUIDE] Install Xposed Framework On Lollipop Android 5.1, 5.0 appeared first on GizDev.com.


How to Install Xposed Framework on Redmi Note 3 without Twrp

$
0
0

How to Install Xposed Framework on Xiaomi Redmi Note 3 without Twrp

redmi-note-3

About Xiaomi Redmi Note 3:-  The smartphone was Launched in November 2015. The phone comes with 5.5 touch screen inches with a resolution of 1080 by 1920. The phone is powered by 1.8 ghz hex-core qualcomm snapdragon processor 650 and comes with 2 gb of ram. Phone packs 16gb of internal storage which can be expanded up to 32gb . The xiaomi redmi note 3 comes with a main camera of 16 megapixels on the back and a front  5 megapixels for selfie. The xiaomi redmi note 3 runs android 5.1 and is powered by a non-removable battery 4050 mah.We already posted

This post about how to install Xposed Framework on redmi note 3, Xposed Framework need for customize your phone, change your phone details, privacy, changing status bar, customizing notification panel and much more .

We already posted guide how to unlock bootlaoder of  redmi note 3 and twrp install rooting guide, here we also guide you how to install Xposed Framework on redmi note 3 with twrp and withour twrp .


Preparation :-  

  • Backup Phone Data .
  • Take rom backup if you have twrp recovery .
  • You Need To Unlock Bootloader To Do This Here Full Guide – Link .
  • Install Twrp Rooting Guide -> Link
  • Without Twrp Unlock bootloader Root With kingroot and use Flash fire to Install Xposed .
  • Download Xposed zip, Xposed apk, Flash fire .
  • Read Guide .

⇓⇓Download Xposed Framework Flash fire⇓⇓

RedmiNote3-xposed-v79.zip

Xposed Installer_3.0 alpha4.apk

FlashFire_0.24.apk


Guide to Install Xposed Framework:-

Method 1 With Twrp Recovery 

  1. Download “RedmiNote3-xposed-v79.zip” and Copy To Your Phone Storage .
  2. Download “Xposed Installer_3.0 alpha4.apk” and Copy To Your Phone Storage .
  3. Turn Off Your Phone .
  4. Turn on in Recovery Mode By (Volume Up + Power ) .
  5. Go To Install Zip In Recovery Navigate to “RedmiNote3-xposed-v79.zip” Select and Swipe to Install .
  6. Reboot Your Phone .
  7. Install “Xposed Installer_3.0 alpha4.apk” .
  8. Open Xposed Installer Click On Framework Check The Status Click On Install / Update .
  9. That’s It Reboot and Enjoy Xposed in redmi Note 3 .

Method 2 With Flash fire 

  1. First root your phone with kingroot .
  2. Download “RedmiNote3-xposed-v79.zip” and Copy To Your Phone Storage .
  3. Download “Xposed Installer_3.0 alpha4.apk” and Copy To Your Phone Storage .
  4. Download “FlashFire_0.24.apk” and Install .
  5. Reboot .
  6. Open FlashFire Install  “RedmiNote3-xposed-v79.zip” .
  7. Install “Xposed Installer_3.0 alpha4.apk” .
  8. Open Xposed Installer Click On Framework Check The Status Click On Install / Update .
  9. That’s It Reboot and Enjoy Xposed in redmi Note 3 .
Xposed-Framework-flash-fire-redmi-note-3 (3) Xposed-Framework-flash-fire-redmi-note-3 (1) Xposed-Framework-flash-fire-redmi-note-3 (2) Xposed-Framework-flash-fire-redmi-note-3 (4)

Browse Modules from Xposed Installer and install .

Xposed-modules

Source :- Miui Forum 

The post How to Install Xposed Framework on Redmi Note 3 without Twrp appeared first on GizDev.com.

[GUIDE] Install Xposed Framework In All Running MIUI v7 Device

$
0
0

[GUIDE] Install Xposed Framework In All Running MIUI v7 Device

Xposed Framework-MIUI v7

Xposed Framework Is A Framework To Customize Your Phone Without Custom Roms , Like Notification Panel, Themes, Crack Apps, Extra Boot Options, Audio Optimize, And Many Plugins You Can Download And Install It By Search From Xposed Framework App, Here Xposed_Framework Install Guide For All Running MIUI V7 Device,  We Will Guide You How To Install Xposed_Framework In Your Phone.

Preparation :-

  • Backup Full Rom Via Cwm Or Twrp
  • Need Rooted Devices With Cwm Or Twrp Custom Recovery
  • Need Only Miui v7 Device
  • Backup Your Files Data
  • Download The Required  Files.
  • Read Instruction.

⇓⇓ Download Xposed Framework ⇓⇓

Xposed+Installer+3.0.apk

xposed-v80-sdk21-arm64.zip

Instruction To Install Instruction Xposed :-

  • Download The Apk & zip File.
  • Copy The Both File To Internal storage.
  • Install “Xposed+Installer+3.0.apk” (don’t open) .
  • Turn Off Your Phone And Enter Recovery Mode By Volume Down + Power Key At The Same Time.
  • In Recovery Go To “Wipe >cache>dalvik cache” Via Recovery.
  • In Recovery Main Menu Navigate To The “zip” File, That You Downloaded Before.
  • Select “zip” File From The List To Flash It.
  • Wait For The Process To Complete, It May Take Some Minutes.
  • Now Reboot Your Device And Enjoy Xposed Framework On Your Device.

If Any Problem Please Let Us Know And Comment Below….. simple-smile Install Chroma [Android 6.0.1] Stable Custom Rom For Huawei Nexus 6P simple-smile Install Chroma [Android 6.0.1] Stable Custom Rom For Huawei Nexus 6P simple-smile Install Chroma [Android 6.0.1] Stable Custom Rom For Huawei Nexus 6P

Source :- miui forum

The post [GUIDE] Install Xposed Framework In All Running MIUI v7 Device appeared first on GizDev.com.

Xposed Installer v2.6.1 for MIUI 7 Global/china Roms

$
0
0

Xposed Installer v2.6.1 for MIUI 7 Global/china Roms

miui7- Xposed

If you are using MIUI 7 in xiaomi Mi 3, Mi 4, Mi 4i, Rdmi note 4g, Redmi 2, Redmi Note 3 with Lollipop you wan to customize the device after rooting with xposed framework so here working Xposed Installer apk for Miui 7 Kitkat and Lollipop Installed phones .

Requirements :-  

  • Miui 7 Kitkat/ Lollipop .
  • Rooted Device Here You Can Find Rooting Guide ->

⇓⇓ Download Xposed Installer v2.6.1 ⇓⇓

Xposed Install Guide :-

  • Download “XposedInstaller_v2.6.1_MIUI.apk” then install The apk .
  • Open Xposed Installer then select Framework. Installation Mode select Classical. Then press Install / Update. Grant root permission. Then select OK to reboot.
  • After that you can manage your Xposed Module from Modules on Xposed. Don’t forget to restart device after enable/disable module.
  • Done. Enjoy it.
email

The post Xposed Installer v2.6.1 for MIUI 7 Global/china Roms appeared first on GizDev.com.

Guide To Install Xposed Framework in EMUI 4.1 and EMUI 3.1 Devices

$
0
0

Guide To Install Xposed Framework in EMUI 4.1 and EMUI 3.1 Devices

Xposed-framework-EMUI-3.1-4.1

Huawei is the 3rd largest smartphone brand and Huawei use own processor on their devices Huawei also used their own user interface called Emotion Ui EMUI. Huawei this year launched manny devices Huawei P9, Honor 5x, Honor 5c, Honor 8, Honor V8, Huawei Mate 8 and many others with Android Lollipop EMUI 3.1 and Marshmallow EMUI 4.0 and EMUI 4.1 user interface so we are decided to Guide How To Install Xposed Framework in EMUI 4.1 and EMUI 3.1 Devices.


What Xposed Framework Does ? 

Xposed Framework will unlock your phone to customize the device, you can customize your phone theme, Status bar, Notification, Changing Device IMEI, Serail no, Model No, customizing Lock Screen, Icons, Blocking adds, Playing Youtube Videos Background and much more. So let’s begin to the guide.


Requirements :-

Unlocked Bootloader for Guide Visit Here

  • Rooted Device Rooting Guide Find Here
  • Custom Recovery TWRP or CWM Find Here 
  • Free System Space

Preparation :-

  • Enable Unkown Source 
  • Download Xposed Installer Apk 
  • Download Xposed Framework Zip for Your Phone Version
  • Read Guide 

 ⇓ ⇓ Download Xposed Framework ⇓ ⇓

Xposed Installer Apk -> XposedInstaller_3.0_alpha4.apk / Mirror Link 

Xposed Framework Marshmallow EMUI 4.0/EMUI 4.1-> Link

Xposed Framework Lollipop EMUI 3.1-> Link

Note:- Download arm64 for 64-bit processor device like Huawei P9, Honor 8, Honor V8, Mate 8, Honor 5c, Honor 7, Honor 4x, Huawei P8, Honor 5x

Download arm for X86 32 bit processor device like Honor 6

How To Install Xposed Framework in EMUI 4.1 and EMUI 3.1 :-

Step 1-> Read Requirements and Preparation .

Step 2-> Download and install Xposed Installer Apk .

Step 3-> Download Xposed Framework flashable zip “xposed-v86.0-sdk..-arm…zip” and copy it to sd card or phone .

Step 4-> Turn on your phone into recovery mode by (Volume Up + Power) .

Step 5-> In recovery mode go to “Install” navigate to “xposed-v86.0-sdk..-arm…zipswipe to install .

Step 6-> Back and Wipe Cache .

Step 7-> Reboot & Enjoy .

Note :- Some phone take 5 to 10 Minute to boot after installing Xposed this is only one time .

Open Xposed from app menu and chek the Xposed Status From Framework .

Xposed-Huawei-P9 (2)

Now Downlado Some Modules From Download

Here Some Modules name you Like:- Youtube Adaway, Youtube Background Playback, Adblocker, PerfectColorBar

Xposed-Huawei-P9 (1)

Now Active Installed Modules From Modules and Reboot

Xposed-Huawei-P9 (3)

Like Share Comment Bellow If You Are Facing Any Kind Of Problem 🙂 

Like Huawei Dev For More Updates :- https://www.facebook.com/HuaweiDev

email

The post Guide To Install Xposed Framework in EMUI 4.1 and EMUI 3.1 Devices appeared first on GizDev.com.

Guide To Install Xposed Framework in Coolpad Note 3 and Cool UI 8.0

$
0
0

nitya

Coolpad Note 3 Xposed Framework - Guide To Install Xposed Framework in Coolpad Note 3 and Cool UI 8.0

Guide To Install Xposed Framework in Coolpad Note 3 and Cool UI 8.0Xposed Framework in Coolpad Note 3

This post about how to install Xposed Framework in Coolpad Note 3 and Note 3 Lite. This method also will work in Coolpad Cool UI 8.0 Android 6.0 Marshmallow Phones.

Coolpad Note 3 is the budget phone of Coolpad launched in India and China. Note 3 launched with MediaTek 6753 processor 3GB o ram Android Lollipop. Coolpad recently released Android 6.0 Marshmallow Cool UI 8.0 for  Note 3 and  Note 3 Lite. Coolpad fixed many bugs and added many features in Cool UI 8.0 Android 6.0 Marshmallow V22. This post about how to install.

Why Xposed Framework?

Xposed Framework will help you to customize your phone, you can customize status bar, lock screen, Notification Panel and others customization. Xposed Framework Module also helps you to play youtube videos in the background with youtube background play module.

Gravity Box there is many features you can customize Lockscreen, Statusbar, Navigation bar, Dialer, also you can record screen with this module.

Preparation:- 

  • Required Rooted Device With Twrp Recovery Here Rooting and TWRP Guide – >.
  • Enable Unknown Source.
  • Backup Phone Apps, Contact, Messages.
  • Backup Full Rom With Twrp Recovery.
  • Download Xposed Installer, Gravity Box, Xposed Flashable Zip File.
  • Read Guide.

⇓⇓ Download Xposed Installer, Gravity Box, Xposed Flashable Zip ⇓⇓

XposedInstaller_3.0_alpha4.apk

Gravity Box Apk

Flashable Zip -> xposed-v86-sdk23-arm64.zip

Guide To Install Xposed Framework in Coolpad Note 3:-

Step 1:- Download and Install “XposedInstaller_3.0_alpha4.apk” and Gravity Box Apk if you want Gravity Box Install but don’t open.

2:- Download “xposed-v86-sdk23-arm64.zip” and copy to phone.

3:- Switch Off your phone and turn on to Twrp recovery mode and install “xposed-v86-sdk23-arm64.zip”.

4:- Wipe Cache and reboot your phone.

5:- Open Xposed Installer-> Modules enable Gravity Box.

Reboot your device if you want to add more modules then open Xposed Installer -> Downloads and Search modules.

Read Also:-

Here Some Modules name you Like:- Youtube Adaway, Youtube Background Playback, Adblocker, PerfectColorBar Search it from Downloads 

Like Share Comment Bellow If You Are Facing Any Kind Of Problem 🙂 

The post Guide To Install Xposed Framework in Coolpad Note 3 and Cool UI 8.0 appeared first on GizDev.com.

How To Install Xposed Framework On MIUI 8 and MIUI 7 + WSM TOOLS

$
0
0

nitya

Xposed Framework On MIUI 8 - How To Install Xposed Framework On MIUI 8 and MIUI 7 + WSM TOOLS

How To Install Xposed Framework On MIUI 8 and MIUI 7 + WSM TOOLSInstall Xposed Framework On MIUI 8

Xiaomi launched their latest flagship smartphone Mi Note 2 and Mi Mix with latest Android 6.0 Marshmallow Miui 8. We already posted Mi Note 2 and Mi Mix rooting guides and stock walls for this phones. Xiaomi also released Android Marshmallow MIUI 8 for Redmi Note 3, Redmi 3s, MI 5, Mi Max and other Mi Redmi devices. Xiaomi also released MIUI 8 with Android Lollipop on their old device we keep updates on our gizrom blog. We already posted Xposed Framework Install guide for Emui and Android Lollipop now we will guide you how to install Xposed Framework on MIUI 8 and MIUI 7 and install WSM TOOLS. Let’s go to the guide How To Install Xposed Framework On MIUI 8 and MIUI 7 + WSM TOOLS.

What does Xposed Framework do? 

Xposed Framework will unlock your phone to customize the device, you can customize your phone theme, Status bar, Notification, Changing Device IMEI, Serial no, Model No, customizing Lock Screen, Icons, Blocking adds, Playing Youtube Videos Background and much more. So let’s begin with the guide.

Supported Devices :- Android 6.0, Android 5.0, Android 5.1 MIUI 7 and MIUI 8 devices Xiaomi Mi 5, Redmi Note 3, Redmi 3s, Mi Max, Mi 5s, Mi 5s Plus, Mi Note 2, Mi Mix.

WSM Tools Features:-

  • Reboot Menu
  • Fastboot Reboot
  • Reboot Into Recovery
  • Reboot Into Fastboot And More

Requirements:-

  • Unlocked Bootloader for Guide Visit Here.
  • Rooted Device Rooting Guide Find Here.
  • Custom Recovery TWRP or CWM Find Here.
  • Free System Space.

Preparation:-

  • Enable Unkown Source.
  • Download Xposed Installer Apk.
  • Download Xposed Framework Zip for Your Phone Version.
  • Read Guide 

 ⇓ ⇓ Download Xposed Installer Apk⇓ ⇓

XposedInstaller_3.0_alpha4.apk / Mirror Link 

 ⇓ ⇓ Download Xposed Framework Android 5.0 Flashable ⇓ ⇓

Framework for 32-bit processors:- xposed-v87-sdk21-arm-MIUI-edition-by-SolarWarez-20161126.zip 

for 64-bit processors:- xposed-v87-sdk21-arm64-MIUI-edition-by-SolarWarez-20161126.zip

Framework for x86 processors:- xposed-v86-sdk21-x86-MIUI-edition-by-SolarWarez-20160710.zip

 ⇓ ⇓ Download Xposed Framework Android 5.1 Flashable ⇓ ⇓

Framework for 32-bit processors:- xposed-v87-sdk22-arm-MIUI-edition-by-SolarWarez-20161126.zip

for 64-bit processors:- xposed-v87-sdk22-arm64-MIUI-edition-by-SolarWarez-20161126.zip

Framework for x86 processors:- xposed-v86-sdk22-x86-MIUI-edition-by-SolarWarez-20160710.zip

 ⇓ ⇓ Download Xposed Framework Android 6.0 / 6.1 Flashable ⇓ ⇓

Framework for 32-bit processors:- xposed-v87-sdk23-arm-MIUI-edition-by-SolarWarez-20161126.zip

for 64-bit processors:- xposed-v87-sdk23-arm64-MIUI-edition-by-SolarWarez-20161126_2.zip

Framework for x86 processors:- xposed-v86-sdk23-x86-MIUI-edition-by-SolarWarez-20160710.zip

 ⇓ ⇓ Download Xposed Framework Uninstaller ⇓ ⇓

Arm X86/ Arm 32 -> xposed-uninstaller-20150831-arm.zip

ARM 64 -> xposed-uninstaller-20150831-arm64.zip

 ⇓ ⇓ Download WSM Tool ⇓ ⇓

Link

Note: – Download arm64 for 64-bit processor device like Xioami MI 5, Mi 5S, MI 5s plus. Redmi Note 3, Redmi 3s, Redmi Note 4, Mi Mix, Mi Max, Mi Note 2 

Arm 32 and X86 old Xiaomi Device 

How To Install Xposed Framework On MIUI 8 and MIUI 7:-

Step 1-> Read Requirements and Preparation.

2-> Download and install Xposed Installer Apk.

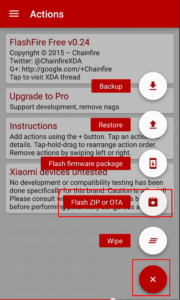
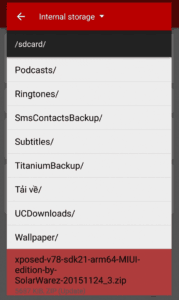
3-> Download Xposed Framework flashable for your Android and Arm Version zip “xposed-v86.0-sdk..-arm…zip” and copy it to sd card or phone.

4-> Turn on your phone into recovery mode by (Volume Up + Power).

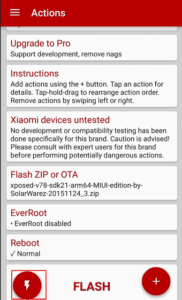
5-> In recovery mode go to “Install” navigate to “xposed-v86.0-sdk..-arm…zip” swipe to install.

6-> Back and Wipe Cache.

7-> Reboot & Enjoy .

Note:- Some phone take 5 to 10 Minute to boot after installing Xposed this is only one time.

Open Xposed from app menu and check the Xposed Status From Framework.

xposed-framework-on-miui-8

Now Download Some Modules From Download

Here Some Modules name you Like:- Youtube Adaway, Youtube Background Playback, Adblocker, PerfectColorBar MIUI tweaks v2.14, Awesome Pop-up Video, Force Touch Detector

Xposed-Huawei-P9 (1)

Now Active Installed Modules From Modules and Reboot

Xposed-Huawei-P9 (3)

To install WSM tools Install wsm.manager_REDMI_NOTE.apk and WSM_XPOSED_5.9.25FIX.zip Via TWRP.

Uninstall Xposed Install UnInstaller Zip If Device Got Bricked Or Other Problem 

More Guides:-

Like Share Comment Bellow If You Are Facing Any Kind Of Problem 🙂 

Like XiaomiDev For More Updates:- https://www.facebook.com/XiaomiDev

The post How To Install Xposed Framework On MIUI 8 and MIUI 7 + WSM TOOLS appeared first on GizDev.com.

Guide To Install Xposed Framework On Android 6.0 Marshmallow

$
0
0

nitya

Xposed Framework On Android 6.0 - Guide To Install Xposed Framework On Android 6.0 Marshmallow

Guide To Install Xposed Framework On Android 6.0 MarshmallowInstall Xposed Framework On Android 6.0

Xposed Framework is one of the best modules to Customize Android Devices with Xposed modules. Google released Android 6.0 Marshmallow in 2015 and after few days rovo89 Xposed developer developed Xposed Framework for Android 6.0 Marshmallow. In this post, we will guide you How To Install Xposed Framework On Android 6.0, 6.0.1 Marshmallow devices. We already posted many others phone Xposed guide for others UI and Android Lollipop Xposed Framework guide.This post will guide you how to install Xposed Framework on ARM, ARM64, x86 Android Marshmallow running devices.

What is Xposed? 

Xposed Framework will unlock your phone to customize the device, you can customize your phone theme, Status bar, Notification, Changing Device IMEI, Serail no, Model No, customizing Lock Screen, Icons, Blocking adds, Playing Youtube Videos Background and much more. So let’s begin with the guide.

We already posted the Xposed guide for EMUI 4.1, Also for MIUI 7 running device. And now this is for stock Android 6.0 Marshmallow running device compatible with ARM, ARM64, x86 (Intel) Android Phones.


Requirements :-

  • Unlocked Bootloader for Guide Visit Here
  • Rooted Device Rooting Guide Find Here
  • Custom Recovery TWRP or CWM Find Here 
  • Free System Space

Preparation :-

  • Do Backup.
  • Enable Unkown Source.
  • Know your device Arm version By Install CPU-Z.
  • Download Xposed Installer Apk.
  • Download Xposed-Framework Zip for Your Hardware Version.
  • Read Guide.

 ⇓ ⇓ Download Xposed Framework and Installer ⇓ ⇓

Xposed Installer Apk -> XposedInstaller_3.1.1.apk /

Xposed-Framework ARM Devices-> Link

ARM64 Devices-> Link

 X86(Intel) Devices -> Link

How To Install Xposed Framework On Android 6.0 Marshmallow:-

Step 1-> Read Requirements and Preparation.

Step 2-> Download and install Xposed Installer Apk Don’t open.

Step 3-> Download New Version Xposed-Framework flashable zip for your device CPU ARM versionxposed-v87.0***-sdk..-arm.zip” and copy it to sd card or phone.

Step 4-> Turn on your phone into recovery mode.

Step 5-> In recovery mode go to “Install” navigate to “xposed-v87.0***-sdk..-arm.zip” swipe to install.

Step 6-> Back and Wipe Cache.

Step 7-> Reboot & Enjoy .

Note: – Some phone take 5 to 10 Minute to boot after installing Xposed this is only one time.

Open Xposed from app menu and chek the Xposed Status From Framework.

Xposed-Huawei-P9 (2)

Now Download Some Modules From Download

Here Some Modules name you Like:- Gravity Box, Amplify, 5Xstana, Youtube Adaway, Youtube Background Playback, Adblocker, PerfectColorBar

Xposed-Huawei-P9 (1)

Now Active Installed Modules From Modules and Reboot

Xposed-Huawei-P9 (3)

Like Share Comment Bellow If You Are Facing Any Kind Of Problem 🙂 

Recommend For You:-

The post Guide To Install Xposed Framework On Android 6.0 Marshmallow appeared first on GizDev.com.


Guide To Install Xposed Framework On Marshmallow LG Stylo 2 Plus

$
0
0

Abhishek

Guide To Install Xposed Framework On Marshmallow LG Stylo 2 Plus

Guide To Install Xposed Framework On Marshmallow LG Stylo 2 Plus

Guide To Install Xposed Framework On Marshmallow LG Stylo 2 PlusXposed Framework is one of the best modules to Customize Android Devices with Xposed modules. Google released Android 6.0 Marshmallow in 2015 and after few days Asreal-Draemoor Xposed developer developed Xposed Framework for Android 6.0 Marshmallow LG Stylo 2 Plus. In this post, we will Guide To Install Xposed Framework On Marshmallow LG Stylo 2 Plus. We already posted many others phone Xposed guide for others UI and Android Lollipop Xposed Framework guide.This post will Guide To Install Xposed Framework On Marshmallow LG Stylo 2 Plus.

What is Xposed? 

Xposed Framework will unlock your phone to customize the device, you can customize your phone theme, Status bar, Notification, Changing Device IMEI, Serail no, Model No, customizing Lock Screen, Icons, Blocking adds, Playing Youtube Videos Background and much more. So let’s begin with the guide.

We already posted the Xposed guide for EMUI 4.1, Also for MIUI 7 running device. And now this is for stock Android 6.0 Marshmallow running device compatible with ARM, ARM64, x86 (Intel) Android Phones.

Recommended For You:

Heading to our post Guide To Install Xposed Framework On Marshmallow LG Stylo 2 Plus.Just download the below APK file and install on your LG Stylo 2 Plus. Follow below steps to install it on your device.

Requirements:-

  • Android 6.0 Marshmallow 
  • LG Stylo 2 Plus
  • Rooted Device Guide->

⇓⇓Download Xposed Framework For LG Stylo 2 Plus ⇓⇓

Xposed_FrameworkLGstylo2_Plus.APK

Requirements 

Steps To Install:

  1. Download the Xposed framework apk from above link.
  2. Install the APK as usual.
  3. After opening the app you will see big red mark starting Xposed framework not installed.
  4. Below that you will see option Install/Update and you will see the latest version of the Xposed framework. Tap on it.
  5. After that, you will two popup Install and other Install VIA recovery.
  6. This is the most important step SELECT INSTALL only.
  7. DO NOT SELECT Install VIA recovery or you will end up in a boot loop. also, you might need to hard reset for mobile to work again.
  8. Then the app itself will download the latest version of the Xposed framework.
  9. After the successful download, it will ask for root permission grant the root permission for it.
  10. The Xposed framework will now be installed, reboot your phone for changes to take effect.
  11. Now open the Xposed framework app and see red mark will be gone, if it is properly installed. You will see a green mark if it is installed properly. Like in the below image.

Congratulations., Now you can install any Xposed module. Enjoy the customizations. If you need any help comment below. 🙂

For Xposed Guides Visit Xposed Framework Section=>

The post Guide To Install Xposed Framework On Marshmallow LG Stylo 2 Plus appeared first on GizDev.com.

Guide To Install Xposed Framework On Samsung J2 2016

$
0
0

Abhishek

Install Xposed Framework On Samsung J2 2016

Guide To Install Xposed Framework On Samsung J2 2016

Install Xposed Framework On Samsung J2 2016Xposed Framework is one of the best modules to Customize Android Devices with Xposed modules. PGPSelva Xposed developer developed Xposed Framework for Samsung J2 2016. In this post, we will Guide To Install Xposed Framework On J2 2016. We already posted many others phone Xposed guide for others UI and Android Lollipop Xposed Framework guide.This post will Guide To Install Xposed Framework On Samsung J2 2016.

What is Xposed? 

Xposed Framework will unlock your phone to customize the device, you can customize your phone theme, Status bar, Notification, Changing Device IMEI, Serail no, Model No, customizing Lock Screen, Icons, Blocking adds, Playing Youtube Videos Background and much more. So let’s begin with the guide.

We already posted the Xposed guide for EMUI 4.1, Also for MIUI 7 running device.

Recommended For You:

Heading to our post Guide To Install Xposed Framework On Samsung J2 2016.Just Follow the procedure and install on your J2 2016. Follow below steps to install it on your device.

Requirements:-

  • Samsung J2 2016
  • Rooted Device Guide->
  • TWRP Installed

⇓⇓Download Xposed Framework For Samsung J2 2016 ⇓⇓

Xposed_framework_SMJ2_2016.Zip

Xposed_Installer.APK

Xposed_Uninstaller.Zip

Steps To Install:

  1. Download Xposed_framework_SMJ2_2016.Zip and Xposed_Installer.APK and uninstaller put all of them in internal memory.
  2. Install Xposed_Installer.APK.
  3. Boot your phone into recovery by pressing Power + VOL UP + HOME buttons.
  4. Now from TWRP home screen select Install and navigate to the Xposed.Zip
  5. Swipe it to install.
  6. After installation reboots your mobile. First boot will take some time to boot.
  7. If you got stuck into boot loop go to recovery and flash the uninstaller.Zip.

Now install Xposed APK to try out some cool modules. Enjoy the customizations. If you need any help comment below. 🙂

For Xposed Guides Visit Xposed Framework Section=>

The post Guide To Install Xposed Framework On Samsung J2 2016 appeared first on GizDev.com.

Guide To Install Xposed Framework On Redmi Note 4 (MIUI 8)

$
0
0

Abhishek

Guide To Install Xposed Framework On Redmi Note 4 (MIUI 8)

Guide To Install Xposed Framework On Redmi Note 4 (MIUI 8)

Guide To Install Xposed Framework On Redmi Note 4 (MIUI 8)Guide To Install Xposed Framework On Redmi Note 4 (MIUI 8). Xposed Framework is one of the best modules to Customize Android Devices with Xposed modules. In this post, we will Guide To Install Xposed Framework On Xiaomi Redmi Note 4 (MIUI 8). We already posted many others phone Xposed guide for others UI and Android Lollipop Xposed Framework guide.This post will Guide To Install Xposed Framework On Redmi Note 4 (MIUI 8).

What is Xposed?

Xposed Framework will unlock your phone to customize the device, you can customize your phone theme, Status bar, Notification, Changing Device IMEI, Serail no, Model No, customizing Lock Screen, Icons, Blocking adds, Playing Youtube Videos Background and much more. So let’s begin with the guide.

We already posted the Xposed guide for EMUI 4.1, Also for MIUI 7 running device. And now this is for stock Android 6.0 Marshmallow running device compatible with ARM, ARM64, x86 (Intel) Android Phones.

Recommended For You:

Heading to our post Guide To Install Xposed Framework On Redmi Note 4 (MIUI 8).Just download the below APK and ZIP file and Flash on your Redmi Note 4. Follow below steps to install it on your device.

Requirements:-

  • Android 6.0 MIUI 8
  • Redmi Note 4
  • Rooted Device 
  • Unlocked Bootloader and TWRP Installed

⇓⇓Download Xposed Framework For Note 4 ⇓⇓

xposed-v87-sdk23-arm64-MIUI-edition.zip

Xposed_FrameworkRedmi_Note4_.APK

Steps To Install:

  • Firstly, make sure you have unlocked bootloader and TWRP installed on your Note 4.
  • Copy xposed-v87-sdk23-arm64-MIUI-edition.zip and Xposed_FrameworkRedmi_Note4_.APK to your external SD card or internal storage.
  • Boot into recovery mode by pressing VOL UP + POWER Button.
  • On the main screen of TWRP, tap on ” Install ” option.
  • Navigate to the ZIP xposed-v87-sdk23-arm64-MIUI-edition.zip swipe to install the ZIP.
  • Reboot your phone, it will take some time to boot, don’t get fired up too quick!!
  • After your phone boots install the Xposed_FrameworkRedmi_Note4_.APK open it.
  • Done enjoy !!!

DONE, You have now successfully installed the Xposed framework on your Note 4. Enjoy the cool modules and customizations. If you liked this post Don’t forget to share it!! If you have any problem comment in the comment box below or you can also message us on our official Facebook page.

For Xposed Guides Visit Xposed Framework Section.

The post Guide To Install Xposed Framework On Redmi Note 4 (MIUI 8) appeared first on GizDev.com.

Guide To Install Xposed Framework On Android 7.0.X Nougat

$
0
0

akash

Install Xposed Framework On Android 7.0 Nougat - Guide To Install Xposed Framework On Android 7.0.X Nougat

Guide To Install Xposed Framework On Android 7.0.X NougatInstall Xposed Framework On Android 7.0.X Nougat

Xposed Framework is one of the best modules to Customize Android Devices with Xposed modules. Google released Android 7.0.X Nougat in 2016 and after few months of waiting Xposed Framework is for available. Today we share Install Xposed Framework on Android 7.0.X Nougat.

” rovo89 ” developer developed Xposed Framework for Android 7.0 Nougat. After long days successfully ported Xposed for nougat. In this post, we will guide you how to install Xposed Framework on Android 7.0 nougat devices. We already posted many others Xposed guide for others UI and Android Lollipop, Marshmallow Xposed guide.This post will guide you how to install Xposed Framework on ARM, ARM64, x86, also Magisk Android nougat running devices.

What is Xposed? 

Xposed Framework will unlock your phone to customize the device, you can customize your phone theme, Status bar, Notification, Changing Device IMEI, Serial no, Model No, customizing Lock Screen, Icons, Blocking adds, Playing Youtube Videos Background and much more.

Install Xposed Framework On Android 7.0 Nougat

We already posted the Xposed guide for a lollipop, marshmallow, EMUI 4.1, Also for MIUI 7 running device. And now this is for stock Android 7.0.X nougat running device compatible with ARM, ARM64, x86 and Magisk Android Phones. If you want to install Xposed on your device then must be needed custom recovery on your device.lets go to the instruction.

Requirements :-

  • Unlocked Bootloader for Guide Visit Here
  • Rooted Device Rooting Guide Find Here
  • Custom Recovery TWRP or CWM Find Here 
  • Free System Space.
You may like also:-

Xposed_Framework On Android 6.0 Marshmallow

Systemless Root Android Nougat And Marshmallow Using Magisk

Preparation :-

  • Do a complete backup of your device.
  • Enable Unkown Source.
  • Know your device ARM version By Install CPU-Z.
  • Download Xposed Installer and Xposed-Framework zip for Your Hardware Version.
  • Read Guide.

⇓ ⇓ Download Xposed Framework and Installer ⇓ ⇓

XposedInstaller_3.1.1.apk

Xposed-Framework ARM Device ⇒ Link

ARM64 Device ⇒ Link

 X86 Device ⇒ Link

Nougat Magisk Version ⇒ Link

How To Install Xposed Framework On Android 7.0.X Nougat:-

  • Read Requirements and Preparation.
  • Download and install Xposed Installer Apk don’t open.
  • Download New Version Xposed-Framework flashable zip for your device CPU ARM version ” Xposed-SDK25-Nougat-xxx-by-PurifyOS.zip ” and copy it to sd card or phone.
  • Now Turn on your phone into recovery mode.
  • In recovery mode go to “Install” navigate to ” Xposed-SDK25-Nougat-xxx-by-PurifyOS.zip “ swipe to install.
  • Then back and Wipe Cache.
  • Reboot your device.
  • After boot up, your device installs Xposed installer and open the app. Go to the > framework if you see ” Xposed Framework version 88 is active ” message then you have successfully installed Xposed on your device.

Note: – Some phone takes 5 to 10 Minute to boot after installing Xposed this is only one time.

Like, share comment below if you are facing any kind of problem 🙂

The post Guide To Install Xposed Framework On Android 7.0.X Nougat appeared first on GizDev.com.

Guide To Install Xposed Module Gravity Box 7.0 For Android Nougat

$
0
0

Abhishek

Xposed Module Gravity Box 7.0 For Android Nougat

Guide To Install Xposed Module Gravity Box 7.0 For Android NougatGravity Box 7.0 For Android Nougat

Xposed framework is being developed for Android Nougat. So the Xposed modules are coming out for Nougat. The very popular Xposed module Gravity Box is now available for Android Nougat. Though it’s not feature packed as for Marshmallow and other Android versions. Also, it’s not stable cause the Xposed for Nougat itself is buggy.Gravity Box 7.0 is the most popular cause of simplicity. Also, it gives the modifications without the rebooting device. You can get the experience of custom ROM by using Gravity Box 7.0.

Features Of Gravity Box 7.0:

  • Status bar tweaks
  • Navigation Bar Tweaks
  • Lockscreen tweaks
  • Hardware/Navigation key actions
  • Pie control
  • Power tweaks
  • Phone tweaks 
  • Media Tweaks

GIZDEV Recommendations:

Support:

  • This module is not stable cause itself the Xposed is buggy.
  • It can work on ROMs closer to AOSP.
  • This may not work on some custom ROMs.
  • This module is tested on following devices,
  • Nexus 5 on Android AOSP 7.0, 7.1, 7.2
  • OnePlus 3T on Oxygen OS 4.1.6

Requirements:

  • Android 7.0 Running device
  • Xposed for Nougat Must be Installed
  • Gravity Box APK (Download from below link)

Recommendations:

⇓⇓ Download Gravity Box 7.0 For Android Nougat ⇓⇓

Gravity_Box_7.0.APK

Installation:

  • Make sure you have Xposed framework is installed.
  • Download Gravity_Box_7.0.APK and install it.
  • Now open Xposed Installer App.
  • Enable the Gravity Box.

Now you can use the Gravity Box to customize your smartphone. If you like the post Don’t forget to share it. If you have any problems reach us at our official Facebook Page GIZDEV.

The post Guide To Install Xposed Module Gravity Box 7.0 For Android Nougat appeared first on GizDev.com.

Install Xposed Framework On Magisk Installed Android 7.0/7.1 Device

$
0
0

akash

Xposed Framework On Magisk Installed Android 7.07.1 Device - Install Xposed Framework On Magisk Installed Android 7.0/7.1 Device

Install Xposed Framework On Magisk Installed Android 7.0/7.1 DeviceXposed Framework On Magisk Installed Android 7.0/7.1 Device

Xposed Framework is one of the best modules to Customize Android Devices with Xposed modules. Now a day almost all android phones root via Magisk. after few months of waiting Xposed Framework is for available for Magisk. Today we share Xposed Framework On Magisk Installed Android 7.0/7.1 Device.

Magisk is a new rooting procedure for Android phones. After long days Xposed has been supported in Magisk. In this post, we will guide you how to install Xposed Framework On Magisk Installed Android 7.0/7.1 Device. We already posted how to Install Xposed Framework On Android 7.0.X Nougat also many others Xposed guide for others UI and Android Lollipop, Marshmallow Xposed guide.This post will guide you how to install Xposed Framework on Magisk Android nougat running devices.

What is Xposed? 

Xposed Framework will unlock your phone to customize the device, you can customize your phone theme, Status bar, Notification, Changing Device IMEI, Serial no, Model No, customizing Lock Screen, Icons, Blocking adds, Playing Youtube Videos Background and much more.

We already posted the Xposed guide for a lollipop, marshmallow, EMUI 4.1, Also for MIUI 7 running device. And now this is for Magisk nougat running device. If you want to install Xposed on your device then must be needed custom recovery on your device.lets go to the instruction.

Requirements:-

  • Unlocked Bootloader for Guide Visit Here
  • Rooted Device Rooting Guide Find Here
  • Custom Recovery TWRP or CWM Find Here 
  • Free System Space.
You may like also:-

Install Xposed_Framework On Android 7.0.X Nougat

Xposed_Framework On Android 6.0 Marshmallow

Systemless Root Android Nougat And Marshmallow Using Magisk

Note:-

  • If your device is running Android 7.1 Nougat or later then flash SDK25.
  • If your device is running Android 7.0 Nougat then flash SDK25.

Preparation:-

  • Do a complete backup of your device.
  • Magisk installed on your device.
  • Download xposed-systemless-v87-sdk24/5-by-PurifyOS.zip for Your Hardware Version.
  • Read Guide.

⇓⇓ Download Xposed Framework For Magisk ⇓⇓

xposed-systemless-v87-sdk24/5-by-PurifyOS.zip

How To Install Xposed Framework On Magisk:-

  • Read Requirements and Preparation.
  • Download New Version Xposed-Framework flashable zip for your device and copy it to sd card or phone.
  • Now Turn on your phone into recovery mode.
  • In recovery mode go to “Install” navigate to ” xposed-systemless-v87-sdk24/5-by-PurifyOS.zip ” swipe to install.
  • Then back and Wipe Cache.
  • Reboot your device.
  • After boot up, you have successfully installed Xposed on your device.

Note: – Some phone takes 5 to 10 Minute to boot after installing Xposed this is only one time.

Like, share comment below if you are facing any kind of problem 🙂

The post Install Xposed Framework On Magisk Installed Android 7.0/7.1 Device appeared first on GizDev.com.

How To Install Xposed Framework On Android Nougat 7.0 and 7.1

$
0
0

nitya

Xposed Framework On Android Nougat - How To Install Xposed Framework On Android Nougat 7.0 and 7.1

How To Install Xposed Framework On Android Nougat 7.0 and 7.1Install Xposed Framework On Android Nougat

The wait is over, finally Xposed Framework beta released for Android Nougat 7.0 and Android 7.1. We already posted Xposed Framework install guide for Android Nougat 7.0 and 7.1 with magisk. This is an Unstable Xposed Framework for Nougat 7.0 and Android 7.1 by purifyos Team. This is the guide How To Install Xposed Framework On Android Nougat with Twrp Recovery. The current version of Xposed Framework tested on Oxygen os, Lineage Os, EMUI, Lineage based ROM’s with Android 7.0 and Android 7.1. This guide will help you How To Install Xposed Framework On Android Nougat 7.0 and 7.1, to install Xposed Framework On Android Nougat you need rooted device with Twrp Recovery.


What is Xposed Framework? 

Xposed Framework will unlock your phone to customize the device. You can customize your phone theme, Status bar, Notification, Changing Device IMEI, Serial no, Model No, customizing Lock Screen, Icons, Blocking adds, Playing YouTube Videos Background and much more. So let’s begin to the guide.


Requirements:-

  • Rooted Device Rooting Guide Find Here
  • Custom Recovery TWRP or CWM Find Here 
  • Free System Space


Preparation:-

  • Enable Unknown Source 
  • Download Xposed Installer Apk.
  • Download Xposed Framework Zip for Your Phone Version.
  • Read Guide 

 ⇓ ⇓Download Xposed Framework⇓ ⇓

Xposed Installer Apk -> Material Design Xposed Installer / Mirror Link 

Flashable Zip SDK25 Android 7.1-> Link

Flashable Zip SDK24 Android 7.0-> Link

Note:-  Download SDK25 flashable zip for Android 7.1 and SDK24 for Android 7.0.


How To Install Xposed Framework On Android Nougat:-

1.) Read Requirements and Preparation.

2.) Download and install Xposed Installer Apk Don’t Open.

3.) Download Xposed Framework flashable zip “xposed-v8*-sdk2*-Xposed-by-PurifyOS.zip” and copy it to sd card or phone.

4.) Turn on your phone into recovery mode.

5.) In recovery mode go to “Install” navigate to “xposed-v8*-sdk2*-Xposed-by-PurifyOS.zip” swipe to install.

6.) Back and Wipe Cache.

7.) Reboot & Enjoy.

Note:- Some phone take 5 to 10 Minute to boot after installing Xposed this is only one time.

Open Xposed from app menu and check the Xposed Status From Framework.

Now Download Some Modules From Download

Guide To Install Xposed Module Gravity Box 7.0 For Android Nougat

Here Some Modules name you Like:- Youtube Adaway, Youtube Background Playback, Adblocker, PerfectColorBar

Now Active Installed Modules From Modules and Reboot.

More Xposed Framework Guide:-

Like Share Comment Bellow If You Are Facing Any Kind Of Problem 🙂 

The post How To Install Xposed Framework On Android Nougat 7.0 and 7.1 appeared first on GizDev.com.


Xposed Framework for EMUI 5.0 and EMUI 5.1 [Install Guide]

$
0
0

nitya

Xposed Framework EMUI 5.0 5.1 - Xposed Framework for EMUI 5.0 and EMUI 5.1 [Install Guide]

Xposed Framework for EMUI 5.0 and EMUI 5.1 [Install Guide]Xposed Framework for EMUI 5.0

The wait is over, finally Xposed Framework beta released for EMUI 5.0 and EMUI 5.1 Android 7.0. We already posted Xposed Framework install guide for Android Nougat 7.0 and 7.1. This is an Unstable Xposed Framework for EMUI 5.0 and EMUI 5.1 by KangVIP@HRTeam. This is the guide How To Install Xposed Framework On Android Nougat with Twrp Recovery. The current version of Xposed Framework for EMUI 5.0 tested on Honor 9, Honor 8, Huawei P9, Honor 6x, Mate 9 Android 7.0 with EMUI 5.x.


What is Xposed Framework? 

Xposed Framework will unlock your phone to customize the device. You can customize your phone theme, Status bar, Notification, Changing Device IMEI, Serial no, Model No, customizing Lock Screen, Icons, Blocking adds, Playing YouTube Videos Background and much more. So let’s begin with the guide.


Supported Devices:-

Huawei ARM-64 with Android 7.0 EMUI 5.0 and EMUI 5.1 device. Huawei P9, Huawei P10, Huawei Mate 9, Honor 8, Honor 9, Honor 6x Etc.


Requirements:-

  • Rooted Device Rooting Guide Find Here
  • Custom Recovery TWRP or CWM Find Here 
  • Free System Space


Preparation:-

  • Enable Unknown Source.
  • Download Xposed Installer Apk.
  • Download Xposed Framework Zip for Your Phone Version.
  • Read Guide 


 ⇓ ⇓ Download Xposed Framework for EMUI 5.0 ⇓ ⇓

Xposed Installer Apk -> XposedInstaller.apk

Xposed Flashable Zip SDK24 Android 7.0 EMUI 5.X-V1  / V2

Uninstaller-> uninstaller-20170719-arm64.zip

Note:-  Try both version if v1 not working try v2.


INSTALL GUIDE:-

1.) Read Requirements and Preparation.

2.) Download and install Xposed Installer Apk Don’t Open.

3.) Download Xposed Framework flashable zip V1 Or V2K5_Xposed_SDK24_arm64.zip” and copy it to sd card or phone.

4.) Turn on your phone into recovery mode Via Volume Up + Power.

5.) In recovery mode go to “Install” navigate to “K5_Xposed_SDK24_arm64.zip” swipe to install.

6.) Back and Wipe Cache.

7.) Reboot & Enjoy.

Note:- Some phone take 5 to 10 Minute to boot after installing Xposed this is only one time.

Open Xposed from app menu and check the Xposed Status From Framework.


Now Download Some Modules From Download

Guide To Install Xposed Module Gravity Box 7.0 For Android Nougat

Here Some Modules name you Like:- Youtube Adaway, Youtube Background Playback, Adblocker, PerfectColorBar

Now Active Installed Modules From Modules and Reboot.

More Xposed Framework Guide:-

Like Share Comment Bellow If You Are Facing Any Kind Of Problem 🙂 

Like Huawei Dev For More Updates:- https://www.facebook.com/HuaweiDev

The post Xposed Framework for EMUI 5.0 and EMUI 5.1 [Install Guide] appeared first on GizDev.com.

Download Latest Magisk v14.0 For Android 7.0 + (Magisk Manager v5.3.0)

$
0
0

Abhishek

Download Latest Magisk v14.0 For Android (Magisk Manager v5.3.0)

Download Latest Magisk v14.0 For Android 7.0 + (Magisk Manager v5.3.0)

Latest Magisk v14.0Here is the Latest Magisk v14.0 For Android. The latest version of popular Magisk is now available for download. This version includes some of the major fixes for previous versions. It includes the busy-box fix also.You can install by any method like TWRP or using ADB flash boot tool. Those who are new can install easily with the help of custom recovery like TWRP. It has a major update for an update for Magisk and installation through ADB. Magisk v14.0 is a good bug fixed app now. If you want to customize your Android then follow the post. Download Latest Magisk v14.0 For Android (Magisk Manager v5.3.0).

Gizdev Recommendations:


Features Of Magisk:-

  • Magisk Mount
  • Magisk Manager
  • Resetprop
  • Multiple entry PointsFully open source
  • Fully open source
  • Standard stuff like DRM-verity checks and much more
  • MagiskSU
  • Systemless Root
  • Hide Root with Magisk Hide


Magisk 14.0 Changelogs:-

  • [SCRIPT] SIMPLIFY INSTALLATION SCRIPTS
  • [SCRIPT] FIX A BUG CAUSING BACKING UP AND RESTORING STOCK BOOT IMAGES FAILURE
  • [SCRIPT] INSTALLATION AND UNINSTALLATION WILL MIGRATE OLD OR BROKEN STOCK BOOT
  • IMAGE BACKUPS TO PROPER FORMAT
  • [SCRIPT] FIX AN ISSUE WITH SELABEL SETTING IN UTIL_FUNCTIONS ON LOLLIPOP
  • [RC SCRIPT] ENABLE LOGD IN POST-FS TO START LOGGING AS EARLY AS POSSIBLE
  • [MAGISKHIDE] MAGISK.IMG MOUNTED IS NO LONGER A REQUIREMENT
  • DEVICES WITH ISSUES MOUNTING MAGISK.IMG CAN NOW RUN IN PROPER CORE-ONLY MODE
  • [MAGISKBOOT] ADD NATIVE FUNCTION TO EXTRACT STOCK SHA1 FROM RAMDISK
  • [B64XZ] NEW TOOL TO EXTRACT COMPRESSED AND ENCODED BINARY DUMPS IN SHELL SCRIPT
  • [BUSYBOX] ADD BUSYBOX TO MAGISK SOURCE, AND EMBED MULTI-ARCH BUSYBOX BINARY
  • INTO UPDATE-BINARY SHELL SCRIPT
  • [BUSYBOX] BUSYBOX IS ADDED INTO PATH FOR ALL BOOT SCRIPTS (POST-FS-DATA.D,
  • SERVICE.D, AND ALL MODULE SCRIPTS)
  • [MAGISKSU] FULLY FIX MULTIUSER ISSUES
  • [MAGIC MOUNT] FIX A TYPO IN CLONING ATTRIBUTES
  • [DAEMON] FIX THE DAEMON CRASHING WHEN BOOT SCRIPTS OPENS A SUBSHELL
  • [DAEMON] ADJUSTMENTS TO PREVENT STOCK SAMSUNG KERNEL RESTRICTIONS ON EXEC
  • SYSTEM CALLS FOR BINARIES STARTED FROM /DATA
  •  [DAEMON] WORKAROUND ON SAMSUNG DEVICE WITH WEIRD FORK BEHAVIORS


Requirements For Installing Magisk v14.0:

  • TWRP Recovery installed on your phone
  • Android 5.0+

⇓⇓ Downloads ⇓⇓

Magisk-v14.0.zip

Magisk Manager v5.3.0

Latest Uninstaller


Recommended For You:


Guide To Install:

  • Download and Install Latest Magisk Manager Apk (Don’t Run).
  • Download the Magisk-v14.0.zip copy to SD Card.
  • Turn Off Your Phone.
  • Turn Into Recovery Mode.
  • Go to install than navigate to the Magisk-v14.0.zip file.
  • Swipe for Install.
  • After install wipe cache.
  • Reboot and Ejoy Magisk.

If you Liked the post Don’t Forget to Share It!! Also, If you have any problems then you can leave a comment in comment box below.

The post Download Latest Magisk v14.0 For Android 7.0 + (Magisk Manager v5.3.0) appeared first on GizDev.com.

Download and Install Xposed Framework For MIUI 9

$
0
0

nitya

Install Xposed Framework For MIUI 9 - Download and Install Xposed Framework For MIUI 9

Download and Install Xposed Framework For MIUI 9Install Xposed Framework For MIUI 9

The wait is over, finally Xposed Framework beta released for MIUI 9 Android 7.0. We already posted Xposed Framework install guide for Android Nougat 7.0 and 7.1. This is an Unstable Xposed Framework For MIUI 9 by SOLARWAREZ & PurifyOS. This is the guide Download and Install Xposed Framework For MIUI 9 Android Nougat 7.0 and 7.1 with Twrp Recovery. The current version of Xposed Framework for MIUI 9 tested on Android 7.0 Android  7.1 with MIUI 9.

What is Xposed Framework? 

Xposed Framework will unlock your phone to customize the device. You can customize your phone theme, Status bar, Notification, Changing Device IMEI, Serial no, Model No, customizing Lock Screen, Icons, Blocking adds, Playing YouTube Videos Background and much more.

Supported Devices:-

ARMA & ARM64 Android 7.0, Android 7.1 with MIUI 9 like devices Redmi Note 3, Redmi Note 4, Xiaomi MI 6, MI 5, MI 5X, Mix Mix, Mi Max.

Requirements:-

  • Unlock Bootloader Find Guide Here
  • Custom Recovery TWRP or CWM Find Here 
  • Rooted Device Rooting Guide Find Here
  • Free System Space

Preparation:-

  • Enable Unknown Source.
  • Download Xposed Installer Apk.
  • Download Xposed Framework Zip for Your Phone Version and “lazyflasher-no-verity-opt-encrypt.zip”.
  • Read Guide 


 ⇓⇓ Download Xposed Framework For MIUI 9 ⇓⇓

lazyflasher-no-verity-opt-encrypt.zip

Installer Xposed Apk -> XposedInstaller_3.1.1.apk

Xposed Flashable Zip SDK24 Android 7.0 MIUI 9-> ARM / ARM64

Xposed Flashable Zip SDK25 Android 7.1 MIUI 9-ARM / ARM64

Uninstaller->  xposed-uninstaller-20150831-arm64.zip


INSTALL GUIDE:-

1.) Read Requirements and Preparation.

2.) Download and install Xposed Installer Apk Don’t Open.

3.) Download Xposed Framework flashable zip SDK24 for Android 7.0 SDK25 for Android 7.1 card or phone check your device arm version using CPU-Z.

4.) Turn on your phone into recovery mode Via Volume Up + Power Select Recovery Mode.

5.) In recovery mode go to “Install” navigate to “lazyflasher-no-verity-opt-encrypt.zip” swipe to install.

6.) Install Xposed Flashable Zip for your phone ARM and Android Version.

7.) Back and Wipe Cache.

8.) Reboot & Enjoy.

Note:- Some phone take 5 to 10 Minute to boot after installing Xposed this is only one time.

Open Xposed from app menu and check the Xposed Status From Framework.

Now Download Some Modules From Download

Guide To Install Xposed Module Gravity Box 7.0 For Android Nougat

Here Some Modules name you Like:- Youtube Adaway, Youtube Background Playback, Adblocker, PerfectColorBar

Now Active Installed Modules From Modules and Reboot, To avoid bootloop flash lazyflasher-no-verity-opt-encrypt.zip

More Xposed Framework Guide:-

Like Share Comment Bellow If You Are Facing Any Kind Of Problem 🙂 

Like Xiaomi Dev For More Updates:- https://www.facebook.com/XiaomiDev/

The post Download and Install Xposed Framework For MIUI 9 appeared first on GizDev.com.

Top 10 Magisk Modules for Android 7.0, Xposed Framework Alternative

$
0
0

nitya

Top 10 Magisk Modules for Android 7.0 - Top 10 Magisk Modules for Android 7.0, Xposed Framework Alternative

Top 10 Magisk Modules for Android 7.0, Xposed Framework AlternativeTop 10 Magisk Modules for Android 7.0

Magisk now alternative of Xposed Framework because of no development progress of Xposed Framework. The Magisk support both rooting Superuser and Magisk Modules for customization same as Xposed Modules. We already posted Xposed Framework guide and Latest Magisk with the install guide. Magisk support both Android 7.0 and Android 6.0 with Superuser root manager and Magisk Framework Modules. Thre are many Magisk Modules you like but here we will share the Top 10 Magisk Modules for Android 7.0.

Features Of Magisk:-

  • Resetprop
  • Hide Root with Magisk Hide
  • Magisk Mount
  • MagiskSU
  • Magisk Manager
  • Magisk Framework
  • Multiple entry PointsFully open source
  • Fully open source
  • Standard stuff like DRM-verity checks and much more
  • Systemless Root

Recommended By Gizdev:-


Here are the Top 10 Magisk Modules for Android 7.0:-


1. App Systemizer

Allows you to convert any application as a system application. This allows you to install applications and Magisk Modules as a system.

Download Link

Installation:- simply flash the latest version of App Systemizer zip via twrp recovery. 


2. ART Optimization

It can optimize the way you handle your applications, making them all faster, and your users report many improvements after installing the module.

Download Link 

Installation:- Search ART Optimization in Magisk Modules or Download the latest zip and flash it via twrp. 


3. ViPER4Android Installer

The systemless installer installs the ViPER4Android application and the driver. Detects and supports the x86 V4A driver. Increase the audio quality of your device.

Download Link

Installation:- Search ViPER4Android in Magisk Modules or Download the latest zip and flash it via twrp. 


4. AM3D Zirene® Sound

AM3D sound mod by Zirene, which allowing easy tweaking around with the audio profiles for your system, it has a simple and minimalistic interface.

Download Link

Installation:- Search AM3D Zirene in Magisk Modules or Download the latest zip and flash it via twrp. 


5. Dolby Atmos

Zte and Lenovo had introduced Dolby’s Atmos Sound technology to their devices but you can also install via Magisk here is the Module.

Download Link

Installation:- Search Dolby Atmos in Magisk Modules to install. 


6. iYTBP Ad-Free YouTube with Background Play

iYTBP Magisk Module allows you to play Ad-Free YouTube videos with Background Playback.

Download Link

Installation:- Search iYTBP in Magisk Modules or Download the latest zip and flash it via twrp.


7. Greenify4Magisk

Greenify can optimize the way your applications work in hibernation mode, greatly optimizing your battery.

Download Link

Installation:- Search Greenify4Magisk in Magisk Modules or Download the latest zip and flash it via twrp.


8. Xposed Framework

Finally, it is possible to have Xposed for Android Nougat 7.0, thanks to Magisk and to the work of the developers, you just have to install this module and then the Xposed APK.

Download Link

Installation:- Search Xposed Framework in Magisk Modules or Download the latest zip for you phone version and flash it via twrp.


9. Emoji One

EmojiOne magisk Module will replace Google Emoji to EmojiOne 3.0, which includes all newly redesigned emojis.

Download Link

Installation:- Search Emoji One in Magisk Modules or Download the latest zip for your phone version and flash it via twrp.


10. Universal SafetyNet Fix

Fix the SafetyNet bug.

Download Link

Installation:- Modules or Download the latest zip for your phone version and flash it via twrp.

More Magisk Modules like Enable Doze for GMS Magisk Module, Increase Headset Volume – Headset Volume Booster, Unified Hosts Adblock.

Hope you like it share like and comment below if you need any installation help 🙂

The post Top 10 Magisk Modules for Android 7.0, Xposed Framework Alternative appeared first on GizDev.com.

Install Official Android Nougat Xposed Framework Xposed Installer 3.1.2

$
0
0

nitya

Official Android Nougat Xposed Framework - Install Official Android Nougat Xposed Framework Xposed Installer 3.1.2

Install Official Android Nougat Xposed Framework Xposed Installer 3.1.2Android Nougat Xposed Framework

The wait is over finally fully working Official Android Nougat Xposed Framework is here for Android 7.0 and Android 7.1. Rovo89 Xposed Framework creator finally completely developed the Android Nougat Xposed Framework with Xposed Installer 3.1.2. We already posted the Beta Xposed Framework and Magisk version of Xposed Framework but there is a lot of bugs. Here is the final working version of Android Nougat Xposed Framework with Xposed Installer 3.1.2 read our guide how to install it.

The current version of Xposed Framework tested on Oxygen os, Lineage Os 14.1, ASOP Lineage and other Stock-based ROM’s. The Official Android Nougat Xposed Framework support Android 7.0 and Android 7.1 ARM64 and X86 Cpu’s. This guide will help Install Official Android Nougat Xposed Framework with Xposed Installer 3.1.2 with Twrp Recovery.


What is Xposed Framework? 

Xposed Framework will unlock your phone to customize the device. You can customize your phone theme, Status bar, Notification, Changing Device IMEI, Serial no, Model No, customizing Lock Screen, Icons, Blocking adds, Playing YouTube Videos Background and much more. So let’s begin with the guide.


Requirements:-

  • Rooted Device Rooting Guide Find Here
  • Custom Recovery TWRP or CWM Find Here 
  • Free System Space


Preparation:-

  • Enable Unknown Source 
  • Download Xposed Installer Apk.
  • Download Xposed Framework Zip for Your Phone Version.
  • Read Guide 


 ⇓⇓Download Android Nougat Xposed Framework⇓⇓

Xposed Installer 3.1.2 ⇒ Xda Link / Mirror Link 

Flashable Zip SDK25 Android 7.1 ⇒ ARM  / ARM64  / x86

Flashable Zip SDK24 Android 7.0 ⇒ ARM  / ARM64  / x86

Xposed-uninstaller ⇒ ARM  / ARM64  / x86

Note:-  Download SDK25 flashable zip for Android 7.1 and SDK24 for Android 7.0. Check your CPU Version using CPU-Z app. ARM64 for new Snapdragon, Samsung Exynos, Huawei Kirin, MediaTek Cpu’s. X86 for Intel Chipset Android Phones. ARM for old Snapdragon, Kirin, MediaTek Android phones.


Install Official Android Nougat Xposed Framework:-

1.) Read Requirements and Preparation.

2.) Download and install Xposed Installer 3.1.2 Apk Don’t Open.

3.) Download Xposed Framework flashable zip for your phone android and CPU version “Xposed-v88-sdk2*-arm**.zip” and copy it to sd card or phone.

4.) Turn on your phone into recovery mode.

5.) In recovery mode go to “Install” navigate to “Xposed-v88-sdk2*-arm**.zip” swipe to install.

6.) Back and Wipe Cache.

7.) Reboot .

8.) Open Xposed Installer app & Enjoy. 

Note:- Some phone take 5 to 10 Minute to boot after installing Xposed this is only one time.


Open Xposed from app menu and check the Xposed Status From Framework.


Now Download Some Modules From Download

Guide To Install Xposed Module Gravity Box 7.0 For Android Nougat

Here Some Modules name you Like:- Youtube Adaway, Youtube Background Playback, Adblocker, PerfectColorBar, Greenify

Now Active Installed Modules From Modules and Reboot. Uninstall anytime by flash uninstaller zip.

More Xposed Framework Guide:-

Like Share Comment Bellow If You Are Facing Any Kind Of Problem 🙂 

The post Install Official Android Nougat Xposed Framework Xposed Installer 3.1.2 appeared first on GizDev.com.

Viewing all 27 articles
Browse latest View live


Latest Images